I have been using ProPresenter for several years now, and I am still learning shortcuts, tips and tricks all the time (and if I’m hones,t most of them come from my High School techs…). Whether you’ve never heard of ProPresenter, are a novice user or a multi-year veteran, here are some helpful tips and tricks to enhance your tech ministry.
ALT+ENTER //
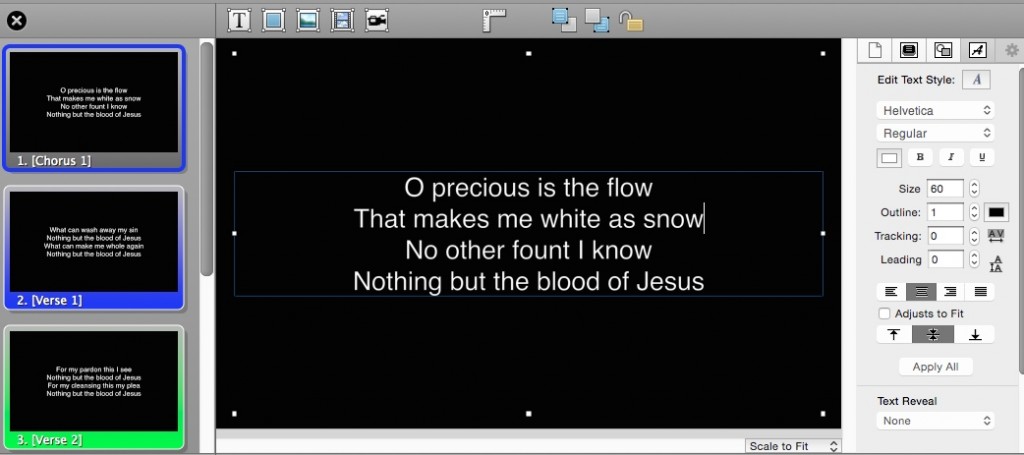
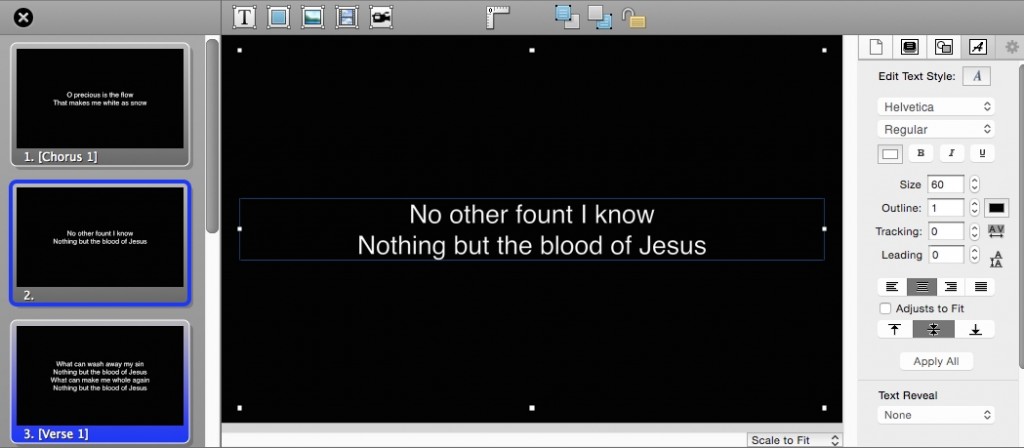
Pro has a ton of shortcuts, but the most helpful one I’ve found for editing is the quick split slide shortcut of “alt+enter”. If you’re editing an already loaded song and are wanting to quickly send a couple lines to a new slide, place your cursor before where you want the split and hit “alt+enter” and watch the magic happen!


For a full list of keyboard shortcuts for Mac, check out this post from Church Motion Graphics.
KEYNOTE IMAGES //
I am a youth pastor, and every week I make my message slides in Keynote. When I learned about exporting my Keynote file as images to import into Pro, it changed my life. The idea here is that each slide becomes its own .jpg file that you can simply and easily import into Pro.* To do this in Keynote, simply follow these steps: File->Export to->Images. On the pop-up window simply choose your preferred output and save the file. It will place a folder containing all the individual .jpg slides to wherever you chose to save them. From there you can create a new file in ProPresenter and simply drag and drop the individual images into the file. To make that easier, hit “command+a” to select all the images at one time. This is a great way to workaround the lack of a formal “import from Keynote” feature. Please note that if you use Powerpoint, Pro has a very handy import feature for you.
*It should be mentioned that when you do this you lose any animation you may have built into your Keynote slides. If you want to fake the animation you’ve lost, simply makes a series of slides that mimics the animation built into the one. For example, if you have 3 bullet points that would normally slide in from off screen, make 3 separate slides. The first slide with the first point, the second slide with the first and second points, and the third slide with all 3, make sense? When the slides are displayed it looks as if one slide contains the animation with new information appearing as you change the slides.
LOOPING ANNOUNCEMENTS //
Do you use looping announcements slides during your pre-service routine? 
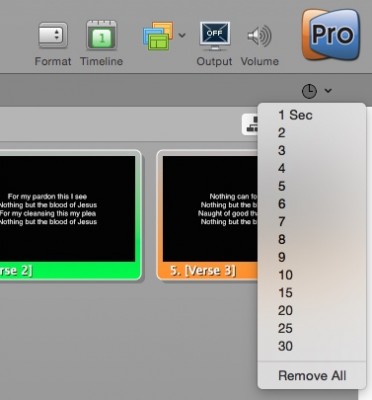
We do every single week in our High School ministry and its a great eye catching visual reminder for our students of upcoming events. With this, Pro has a neat little button for quickly adding a timed loop. When you set up a file for announcements (we have our Sunday and Wednesday looping announcements files being updated each week) a quick way
to add a timer is by clicking on the format bar in your toolbar, then clicking on the clock on the far right hand side. Then, simply choose how long you’d like each slide to be displayed. This will also automatically add a “loop back to first slide” function to the last slide in the file. This is what creates the loop that restarts the announcements. Once again, this is a great tool we use weekly, and we love it. Try it out on your pre-service announcements.
SONG SELECT IMPORT //
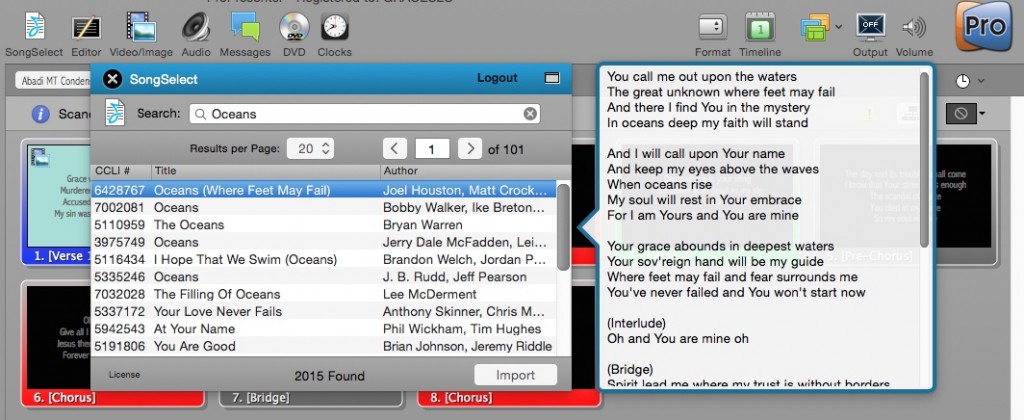
Okay, granted this may not qualify as a “super user” feature, but if you’re not using the SongSelect import, what are you doing?! This will make your life so much easier. To import any song hosted at songselect.com (this includes top 40 CCLI and countless more) simply click on the SongSelect icon on your toolbar. A search bar will pop up for you to type in the name of a song or artist. Hit enter and a list will appear of songs to choose from.
Click the song title and click import. (Note: when you click the song title a preview window will appear on the right hand side displaying the lyrics. This lets you know if you have the correct version your searching for.)

When you click ,import,’ you can chose how many lines to break up the song into using the delimiter(s) per slide box, you can see it defaulted mine to 5, make sure you have the correct size and template chosen, and hit import.
However a deeper use of the feature can be explored by clicking the “edit” button found in the bottom left of this window. When you click this it opens a much larger window that really lets you edit the song before importing it. Information like artist, copyright, song structure, template, and more can be changed, all from one convenient place. This saves you from having to go back later and edit the information or structure of the song. Once again, this feature is a life saver! Stop looking at your chord chart and hand typing the lyrics in, chances are it’s in SongSelect.

For the sake of time I only have one more feature for you and that is…
REMOTE APP //
You may or may not know this, but ProPresenter has released an iPhone app that lets you remotely control your presentations. This feature is much more apt for the speaker to handle the changing and speed of their own content, or for someone who has to change slides from somewhere other than the compute (such as Front of House). With a simple view showing the layout of the presentation, the speaker can easily flip back and forth between images and is not at the mercy of the person running the computer in the tech booth. I have personally used this feature and I enjoy it very much. Now, to properly use this feature there are a few important things you need to know.
1. You need to purchase the app from the app store for $4.99. Yes it costs more than free or $.99 but trust me, it’s worth the $5.
2. You need to be on the same network as your computer. For example: if my phone is on the office wifi, and not the campus wifi, my remote will not work. So make sure to check your phone’s connection against the computer’s.
3. You will need to setup ProPresenter to allow remote access to it. To do this click the iPhone icon in the toolbar. (if you do not see this right click the toolbar and chose “edit toolbar” then drag the iPhone icon to your toolbar and save it.) This allows you to allow or disallow access to Pro via an iPhone. Make sure the icon looks like the phone when it’s on, not off.
4. You need to go into Preferences under the ProPresenter menu. What you are going to do here is click “Network”. Under “ProPresenter Remote Server” click “Enable” and “Controller”. This will allow your iPhone to control the program.
5. Open the app and chose the computer you want to control. It will ask for a password. This password can be set back under the area mentioned in step 4. I would recommend just placing a single character in there. That way you’re not scrambling trying to remember the password up front, or having to ask the tech person what it is so you can log in. Trust me, it’s happened to me and it’s just awkward.
Once in the app you can choose from various folders you’ve created and chose the appropriate presentation you need. Once opened, viola, you’re in control, remotely.
That may seem like a lot of steps to go through just to control your own stuff, but once you set it up, the next time all you do is log in, find your presentation, and go for it.
There are a myriad of “power user” features that this amazing software has to offer, and there is no way we can list them all.
However, our goal is to make you a little more aware of how you can use this powerful ministry tool.
Have a not so obvious Pro feature that you use regularly? Comment below and let us know!
As always, check out the FAQ and help articles over at Renewed Vision, the creators of ProPresenter.
They have a wealth of knowledge hosted on their site from setup and basic functionality, to veteran user techniques.
For another great article on maximizing your Mac to run ProPresenter and perform well week in and week out, check out The Creative Pastor. We’ve already implemented some of their steps on our youth group Mac mini and it’s made a huge difference!

