In its most simple terms, equalization (or EQ, for short) refers to the boosting of desired frequencies and cutting of undesirable frequencies on a given audio signal. In broader usage, it can be used to correct specific problems on that signal, to overcome deficiencies in the frequency response of a microphone (or the timbre of an instrument), allow contrasting sounds from several sound sources to blend together within a mix, increase separation between audio signals by reducing the frequencies that cause “leakage,” and to alter a sound purely for musical or creative reasons. Equalizers are used to “dial in” a certain instrument or voice to add clarity and make it sound is good as it possibly can. Separating frequencies with equalization leads to a clean audio signal from the source, and therefore a much, much cleaner overall mix.
While that may seem like a lot of information to take in at once, the manipulation of the entire frequency spectrum on an EQ is relatively simple, and easy to get a handle on.
TYPES OF EQUALIZERS
Equalizers are broken down into two types: parametric and graphic.
PARAMETRIC EQUALIZERS
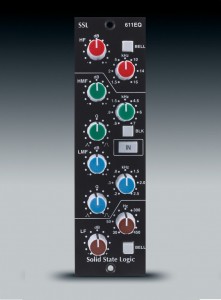
Parametric EQs have become the standard on most I/O modules because of their flexibility and performance capabilities. They are divided into broad ranges of frequencies (High/Mid/Low on 3-band parametric EQs, and High/High-Mid/Mid/Low-Mid/Low on 5-band parametric EQs), and allows the user to control a finer, more select range of frequencies within those divisions. Generally each set of frequency bands will overlap into the next, providing smooth transitions between frequency bands or allowing multiple curves within a narrow frequency range. Once the user decides which range of frequencies they wish to manipulate, there are controls for Q (which stands for quality – sometimes referred to as BW, or bandwidth) which changes the range of frequencies that will be effected, and an amplifier that will either cut or boost those selected frequencies.
The picture to the right is the EQ panel for the SSL 4000-E series large-format console. It is a 4-band parametric equalizer, broken into highs (red), high-mids (green), low-mids (blue), and lows (brown). You can see from the photo the three controls mentioned above. Top-down in each section of knobs, there is the amplifier to control the boost/cut to the frequency range selected by the middle knob, while the third knob controls the size of the curve from the base frequency selected
GRAPHIC EQUALIZERS
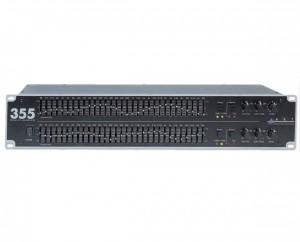
Graphic EQs are usually reserved for fine-tuning a sound system to match the acoustic of a room, and provide boosts/cuts over a series of frequencies that are spaced according to musical intervals. The controls of a graphic equalizer are a simple series of linear sliders, arranged vertically in a side-by-side comparison. This gives the user a “graphic” representation of the overall EQ curve across the entire frequency spectrum. Graphic EQs offer far greater control over individual frequencies, and not a broad scale – as a result, they are not conducive for equalizing an instrument.
The photo to the right is the Art 355 Stereo Graphic Equalizer. As you can see, the entire frequency spectrum (humans are capable of hearing frequencies between 20Hz and 20kHz) is displayed, with linear sliders arranged side-by-side at each interval that allow the user to boost or cut each frequency individually.
FILTERS
Filters are an easy way to get rid of a whole mess of frequencies that you don’t have a use for on a given audio signal. There are three basic types of filters: High-Pass Filters, Low-Pass Filters and Notch Filters.
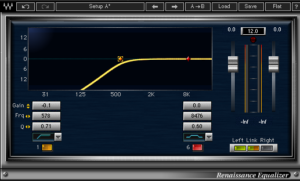
HIGH-PASS FILTERS
These filters allow only high frequencies to pass through them (hence the name). The user has the ability to select the cutoff frequency, and all frequencies below that point will be cut logarithmically until full attenuation is achieved. The photo to the left displays a high-pass filter with 500Hz being the cutoff frequency.
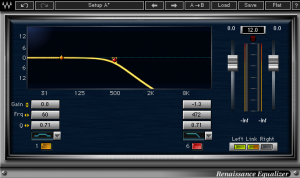
LOW-PASS FILTERS
Conversely, low-pass filters only allow low frequencies to be passed. Just like their high-frequency counterparts, the user can control the cutoff point, and all frequencies above that will be logarithmically cut until full attenuation is achieved. The photo to the right displays a low-pass filter with 500Hz being the cutoff frequency.
NOTCH FILTERS
Notch Filters are frequency-specific filters with a very small radius (a total of 9 frequencies in the bandwidth). They are used to cut undesirable discrete frequency noises, such as 60-cycle hum. Since it is known that 60Hz is the frequency of the hum, the user can target 60Hz on the filter, and the filter will effectively eliminate 56Hz-64Hz (nine frequencies, with the target at center) from your mix.
USES FOR EQUALIZATION
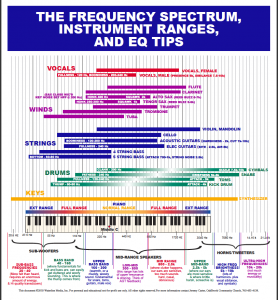
There are many uses for equalization, but ultimately it boils down to this: making the sound sources sound as good as the possibly can. In order to get that best possible sound, you’re going to have to play around with the sound sources until you find what works for that specific source. Because people and instruments vary, there isn’t a set number you can lock in. However, below are some common frequency outputs (and musician lingo) from instruments, to give you a baseline to start from.
KICK DRUM: Bottom depth and “umph” at around 60-80Hz, attack at around 2.5kHz.
SNARE DRUM: “Fatness” at around 240Hz, “crispness” around 5kHz.
HAT/CYMBALS: “Clank” at around 200Hz, “shimmer” or “sizzle” at around 7.5-10kHz.
RACK TOMS: Fullness at around 240Hz, attack at around 5kHz.
FLOOR TOMS: Fullness at around 80-120Hz, attack at around 5kHz.
CONGA/BONGO: Resonance at around 200-240Hz, presence or “slap” at around 5kHz.
BASS GUITAR: Bottom at around 60-80Hz, “pluck” at around 700Hz-1kHz, and slap at around 5kHz.
ELECTRIC GUITAR: Fullness at around 240Hz, “bite” at around 2.5-4kHz.
ACOUSTIC GUITAR: Fullness at around 80-120Hz, “body” at around 240Hz, and “clarity” at around 2.5-5kHz.
PIANO: Bottom at around 80-120Hz, “presence” at around 2.5-5kHz.
VOCALS: Fullness at around 120Hz, “boominess” at around 200-240Hz, “presence” at around 5kHz, and sibilance at 7.5-10kHz.
Using these examples as a baseline, you can play around with the frequency, Q and gain settings on your equalizer to really dial in the sound. The graphic below will provide a much more detailed look at equalization ranges for a wide variety of instruments.
